Construction Part 2
Control Surfaces
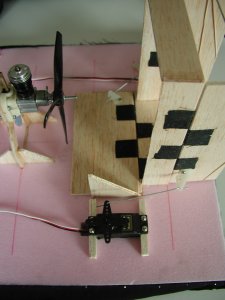 The rudders are connected to 1/8 inch by one inch wide balsa uprights. The top section is just glued with a butt joint. As a future improvement, this structure could be stronger and the top section could be better connected to the uprights but it is still strong enough as it is. The lift deflector is attached to two pieces of 1/16 thick balsa glued directly to the foam on the top surface, which is visible, and the inner surface of the lift duct.
All of the movable surfaces where attached with the same technique: fabric hinges. I cut a basic fabric into one by two inch strips. Four of these strips per surface were plenty on my craft. I sanded the leading edges of the surfaces to a sharp edge so the fabric could cross over the edge cleanly. I used glue (Weldbond or any heavy craft glue would work) to attach the fabric to the control surface, saturating the material similar to the way fiber glass is used and alternating sides of the control surface as shown in the pictures. Once that dried, I could attach the other half of the fabric to the uprights and lift duct respectively in the same way.
The control surfaces attached to the servos with simple metal connecting rods made form a metal wire that comes covered in plastic. Im not sure what its for, but I think it is used for training plants. Z bends at either end of the rods connect to the plastic control horns. To actuate the second rudder, I drilled small holes in the top of the rudders and used more wire bent in a c shape to connect them. This works, but they had to be secured with rubber-bands when the connecting rod popped out of place. This made the rod dig into the top of the rudder. It would be much more secure to go ahead and use two more of the control horns and a connecting rod with z bends to link the two rudders.
Fuel Tank
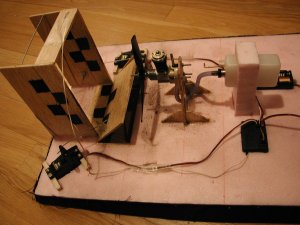 The current set-up includes a piece of foam which holds the tank up high enough for the engine to be able to easily suck in fuel (around or above the height of the carburetor.) The foam kept coming loose in the beginning, but was fixed with a tighter fitting piece. It cant be glued in since the tank and foam need to be removable for filling the tank and priming the fuel lines, which can already both be difficult and frustrating tasks. Unfortunately, the tank soon loosened up and was moving around and falling out of the foam support, so it is currently held in place with rubber bands lashed around the tank and foam.
Instead of this design, I would suggest gluing balsa braces on either side of the foam so the stand can securely slot into the body without using glue. That would keep the tank upright and secure without making it any more difficult to work with. A rubber-band would still be needed to hold the tank from falling out, but the stand would be much more stable.