The Rim/ Joining the Neck
Attaching the sides and the neck are the first big glue ups of the project. This is really getting into the exciting bit where random pieces of wood start to look like a mandolin.
Glueing the Sides
 Before I started with
the gluing, I had to cut down the sides for length in order to butt up
to one another cleanly at the tail end. I glued the sides onto the tail
and head blocks using epoxy. Epoxy was used in order to fill the gaps
left by the imperfect fit between the sides and the head block. To hold
the sides while they dried, I used a central
dowel to wrap smaller ruberbands around the edge. This method made it
very easy to
secure the sides without an extra set of hands. It also let me more
easily position the sides.
Before I started with
the gluing, I had to cut down the sides for length in order to butt up
to one another cleanly at the tail end. I glued the sides onto the tail
and head blocks using epoxy. Epoxy was used in order to fill the gaps
left by the imperfect fit between the sides and the head block. To hold
the sides while they dried, I used a central
dowel to wrap smaller ruberbands around the edge. This method made it
very easy to
secure the sides without an extra set of hands. It also let me more
easily position the sides.
Glued Up
 This is the rim before I
did any of the necessary triming to the sides.
This is the rim before I
did any of the necessary triming to the sides.
Roughing the Neck Angle
 I used the band saw to
rough cut the
heel of the neck to the same angle as the sides.
I used the band saw to
rough cut the
heel of the neck to the same angle as the sides.
Shape the Neck
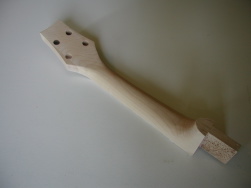 At this point, I was
able to partially carve the neck. I shaped the peg head to its final
shape, but left the heel and neck oversized so they could be carved to
their final dimensions when attached to the rim, top, back and the
fretboard.
At this point, I was
able to partially carve the neck. I shaped the peg head to its final
shape, but left the heel and neck oversized so they could be carved to
their final dimensions when attached to the rim, top, back and the
fretboard.
Leveling the Rim
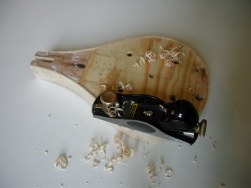 To get the sides to
thickness on the top, I used a plane as shown in the picture. For the
final smoothing and leveling, I sanded the rim using the flat surface
of a belt sander that wasn't running. The back can't be flatened until
the neck is attached since the base of the neck needs to be level with
the back of the head block.
To get the sides to
thickness on the top, I used a plane as shown in the picture. For the
final smoothing and leveling, I sanded the rim using the flat surface
of a belt sander that wasn't running. The back can't be flatened until
the neck is attached since the base of the neck needs to be level with
the back of the head block.
Attaching the Neck
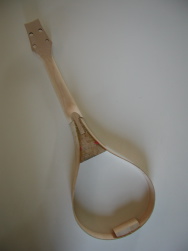
 The neck was glued into
place with wood glue. I had to use a very small amount of glue.
Any more caused the joint to lock together to the point where I
counldn't push the neck all the way in. Once I attached the neck I was
able to flatten the entire back surface as I had done with the front.
The body ended up being slightly thinner than I had planed. The
angled design of the sides requires a compound bend, which costs some
width, so I had to sand down the entire back to about a 1/16th of an
inch thinner than the planned 1.625 inch body depth.
The neck was glued into
place with wood glue. I had to use a very small amount of glue.
Any more caused the joint to lock together to the point where I
counldn't push the neck all the way in. Once I attached the neck I was
able to flatten the entire back surface as I had done with the front.
The body ended up being slightly thinner than I had planed. The
angled design of the sides requires a compound bend, which costs some
width, so I had to sand down the entire back to about a 1/16th of an
inch thinner than the planned 1.625 inch body depth.
Kerfed Lining
 I used cloths pins to
hold on the kerfed lining while the glue dried. Once dry, I sanded the
lining flush the same way I had flattened the rim.
I used cloths pins to
hold on the kerfed lining while the glue dried. Once dry, I sanded the
lining flush the same way I had flattened the rim.
The Finished Rim
 Here is the completed
rim ready for the top and back to be attached. I was originally going
to finish carving the neck at this stage, but decided it would be best
to wait. In fact, it would have
been easier to just leave all of the carving until after
the top, back and fretboard were in place. That way, everything could
be carved at the same time since all of these parts flow together.
Here is the completed
rim ready for the top and back to be attached. I was originally going
to finish carving the neck at this stage, but decided it would be best
to wait. In fact, it would have
been easier to just leave all of the carving until after
the top, back and fretboard were in place. That way, everything could
be carved at the same time since all of these parts flow together.